Pete's Log: Zwavejs2mqtt on Raspberry Pi K3S Cluster
Entry #2012, (Coding, Hacking, & CS stuff, Home Automation)(posted when I was 43 years old.)
I don't know if this is the ideal way to do it, but it works for me and I did a lot of digging to get it working, so here it is. Boring details on how I got here follow below. This is current as of Zwavejs2mqtt 5.7.2 and K3s v1.21.5+k3s1.
Let's start with something easy
namespace.yaml
apiVersion: v1 kind: Namespace metadata: name: zwave
Next, let's add some persistent storage. Zwavejs2mqtt stores its persistent data in /usr/src/app/store by default, so we'll be mounting a persistent volume there. I use Longhorn to manage my persistent storage, so that's what you'll see here. You can change the storageClassName to something else if you're using something else, such as local-path.
storage.yaml
apiVersion: v1 kind: PersistentVolumeClaim metadata: name: longhorn-zwave-store-pvc namespace: zwave spec: accessModes: - ReadWriteOnce storageClassName: longhorn resources: requests: storage: 4Gi
Next, we need to provide a settings.json file for Zwavejs2mqtt or it won't start up right and the container will terminate after a short while. At least that has been my experience. Create a settings.json file with the following contents:
{ "mqtt": { "name": "Zwavejs2Mqtt", "host": "localhost", "port": 1883, "qos":1, "prefix": "zwave", "reconnectPeriod": 3000, "retain": true, "clean":true, "auth":false, "disabled": true }, "gateway": { "type":0, "plugins": [], "authEnabled": false, "payloadType": 0, "nodeNames":true, "hassDiscovery":true, "discoveryPrefix":"homeassistant", "logEnabled":true, "logLevel":"silly", "logToFile":false, "values":[] }, "zwave": { "port":"/dev/zwave", "commandsTimeout":30, "logLevel":"silly", "securityKeys": { "S2_Authenticated":"ADD-YOUR-KEY-HERE" }, "deviceConfigPriorityDir":"/usr/src/app/store/config", "logToFile":true, "serverEnabled":false, "enableStatistics":false, "serverPort":3000, "disclaimerVersion":1 } }
If you have a network key for your Zwave stick, add it where it says ADD-YOUR-KEY-HERE, otherwise blank that out. You can mostly correlate those keys to the settings UI if you want to pre-fill any of the rest of them. Otherwise this is enough to get started and you can adjust them in the UI afterwards. Now base64 encode that file:
base64 -w 0 settings.json
Since I have my network key in the settings file, I use a secret to map it, but a ConfigMap would probably also work.
settings-secret.json
apiVersion: v1 kind: Secret metadata: name: zwavejs2mqtt namespace: zwave type: Opaque data: settings.json: | base64encodedoutputfrompreviouscommand
Make sure to replace base64encodedoutputfrompreviouscommand with the actual output of the command.
Now we can do our deployment. We're going to mount the zwave stick, the persistent volume, and the secret into the container. Zwavejs2mqtt needs the settings.json file to be writable, so we can't directly mount our secret to /usr/src/app/store/settings.json. Instead we have to mount it elsewhere and then copy it. This is the hackiest part of my configuration. I use the -i flag to cp with the pipe from false to make sure I don't overwrite settings.json once it's there since the Zwavejs2mqtt web UI saves the settings to that file. (I can't use the -n flag to cp because the docker image uses BusyBox and the BusyBox cp command doesn't support -n)
deployment.yaml
apiVersion: apps/v1 kind: Deployment metadata: name: zwave namespace: zwave spec: replicas: 1 selector: matchLabels: app: zwave template: metadata: labels: app: zwave spec: containers: - name: zwave image: zwavejs/zwavejs2mqtt:latest env: - name: TZ value: America/Chicago lifecycle: postStart: exec: command: ["/bin/sh", "-c", "false | cp -i /usr/src/app/startup/settings.json /usr/src/app/store"] ports: - containerPort: 8091 name: http protocol: TCP resources: limits: cpu: "1" memory: 512Mi requests: cpu: "1" memory: 400Mi securityContext: allowPrivilegeEscalation: true privileged: true volumeMounts: - mountPath: /dev/zwave name: zwavestick - mountPath: /usr/src/app/store name: data - mountPath: /usr/src/app/startup name: config nodeSelector: kubernetes.io/hostname: CHANGEME #<--- the name of your cluster node that the zwave usb stick is in volumes: - name: config secret: defaultMode: 0666 secretName: zwavejs2mqtt - name: zwavestick hostPath: # Do not use /dev/ttyUSBX serial devices, as those mappings can change over time. # Instead, use the /dev/serial/by-id/X serial device for your Z-Wave stick. path: /dev/serial/by-id/CHANGEME type: CharDevice - name: data persistentVolumeClaim: claimName: longhorn-zwave-store-pvc #CHANGEME if you changed the name of the PVC in storage.yaml
Make sure to update the CHANGEMEs in the file before applying.
Next is the service and ingress
service.yaml
apiVersion: v1 kind: Service metadata: name: zwave namespace: zwave labels: app: zwave spec: type: ClusterIP ports: - name: http port: 8091 selector: app: zwave
ingress.yaml
apiVersion: networking.k8s.io/v1 kind: Ingress metadata: name: zwave-ingress namespace: zwave annotations: kubernetes.io/ingress.class: "nginx" cert-manager.io/cluster-issuer: letsencrypt-prod # change to match your issuer name spec: tls: - secretName: zwave-your-domain-tls # change to the secret name you want for your certificate hosts: - zwave.your.domain # change to your domain rules: - host: zwave.your.domain # change to your domain http: paths: - path: / pathType: Prefix backend: service: name: zwave port: number: 8091
I'm using nginx because I couldn't make traefik and cert-manager play nice together. If you're using traefik, change the kubernetes.io/ingress.class line. If you don't need HTTPS via cert-manager, you can get rid of the cert-manager.io/cluster-issuer line and the tls: key with the three lines below it.
And that's my configuration. Hacky in places, but it works for me. Boring details follow.
So after my Monday evening post, I decided to take on Cert Manager, which other than making sure I was using the ARM images worked pretty well. I created a Let's Encrypt cert for my Longhorn dashboard and felt pretty accomplished.
Last night I took on a tougher opponent: Zwavejs2mqtt. As seen above, I got it working. But it was a slog. Their documentation does have instructions for installing it in Kubernetes. But it tells you to apply a kustomization file that doesn't actually seem to exist and then ends with the tip "You will likely need to instead use this as a base, and then layer on top patches or resource customizations to suit your needs. Alternatively, copy all of the resources from the kubernetes resources directory of this repository."
Luckily, the kubernetes resources directory existed and had some manifests that got me started. Diffing my manifests with theirs shows some significant differences. The first issue was that it told me /dev/serial/by-id/my-zwave-stick was not a file. This was fixed by changing the type in their deployment.yaml file from File to CharDevice.
The next issue was that the app wouldn't start up without a valid settings.json file. Instead it would give me the following:
2021-09-29 22:01:54.521 INFO APP: Version: 5.7.2 2021-09-29 22:01:54.528 INFO APP: Application path:/usr/src/app ______ _ ___ _ _ |___ / (_) |__ \ | | | | / /_ ____ ___ _____ _ ___ ) |_ __ ___ __ _| |_| |_ / /\ \ /\ / / _` \ \ / / _ \ / __| / /| '_ ` _ \ / _` | __| __| / /__\ V V / (_| |\ V / __/ \__ \/ /_| | | | | | (_| | |_| |_ /_____|\_/\_/ \__,_| \_/ \___| |___/____|_| |_| |_|\__, |\__|\__| _/ | | | |__/ |_| 2021-09-29 22:01:54.574 WARN STORE: settings.json not found 2021-09-29 22:01:54.580 WARN STORE: scenes.json not found 2021-09-29 22:01:54.584 WARN STORE: nodes.json not found 2021-09-29 22:01:54.606 WARN STORE: users.json not found 2021-09-29 22:01:54.656 INFO APP: Listening on port 8091 host 0.0.0.0 protocol HTTP 2021-09-29 22:01:54.956 ERROR GATEWAY: Zwave settings are not valid
Their deployment.yaml file had a commented-out option for putting settings.json in a secret, which sounds like a good way to get this missing file into the deployment, but nowhere could I find any documentation on what this file should look like. I later discovered that if you configure settings via their web UI and then save them, it writes them out to settings.json, which is where the template file above comes from. But at this point I didn't have a working web UI, so I was stuck and the internet wasn't helping.
So instead I dug into the source code (which is TypeScript) and found the shape of settings.json that it expects looks like this:
export interface Settings { mqtt?: MqttConfig, zwave?: ZwaveConfig, gateway?: GatewayConfig }
I tracked down what MqttConfig, ZwaveConfig and GatewayConfig are supposed to look like and put together a minimal settings.json file based on that, added it as a secret and uncommented the lines in the deployment.yaml file for the secret. Which gave me a settings.json, but now the app was complaing about the file being read-only:
EROFS: read-only file system, open '/usr/src/app/store/settings.json'
It seems writing to mounted secrets may have been a thing in the past, but not anymore. After trying a few things, I finally just mounted the secret to somewhere else and added a lifecycle postStart command to copy the settings.json file to the right place. That got me further again and for the first time I was able to get the web UI to launch. But the UI kept giving me the error
Driver: Cannot read property 'startsWith' of undefined
Which I resolved simply by going into the settings and saving them. This results in a settings.json file being written out with more attributes than I had included, which got rid of that previous error. The only thing left was to get the network key for my Zwave stick correctly configured. Zwave sticks store their network configuration and require a network key. There's no factory reset without that key. Luckily I was able to extract that key from a Home Assistant backup.
ZWavejs2mqtt offered me four options where I could enter a key: S2 Unauthenticated, S2 Authenticated, S2 Access Control and S0 Legacy. So I figured I'd just paste my key in all four be good to go, but ZWavejs2mqtt gave some error about that not being secure. So by trial and error, I found that if I put that key only in S2 Authenticated and left the rest empty, ZWavejs2mqtt would unlock my Zwave stick and discover my network.
This was incredibly rewarding to see:
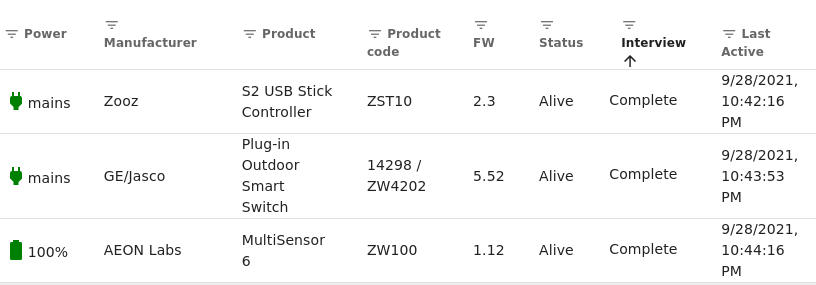
I jotted down a few notes, played around with it just a bit, then headed to bed for it was late. ZWavejs2mqtt (and its parent project Zwavejs) look promising. It's still a young project but it's come pretty far in a short time. The web interface, once working, is much more useful than the previous HA Zwave integration. I was happy.
Tonight's project was going to be staying up late to document in detail what I stayed up late doing yesterday. But first I hit a different hiccup. Since cert-manager was so easy to set up on Monday, I figured I'd update my zwave ingress to do HTTPS. That did not turn out to be as easy as it was supposed to be.
When cert-manager makes its acme request to Let's Encrypt, it spins up a temporary ingress to handle the challenge. But the main ingress stays in place. Monday that didn't seem to be a problem. Tonight the request for /.well-known/acme-challenge/... got directed to ZWavejs2mqtt instead of the temporary ingress and ZWavejs2mqtt dutifully responded with a 404.
There's a cert-manager annotation that's supposed to help in these cases:
acme.cert-manager.io/http01-edit-in-place: "true"
What it does is patch your existing ingress to handle the /.well-known path instead of spinning up a new ingress. But that didn't work either and after some troubleshooting I found a variety of errors of this nature in my Traefik logs:
level=error msg="Cannot create service: subset not found" providerName=kubernetes ingress=zwave serviceName=cm-acme-http-solver-rt5qn servicePort=8089 namespace=zwave level=error msg="Cannot create service: service not found" namespace=zwave serviceName=cm-acme-http-solver-gjhsl servicePort=8089 providerName=kubernetes ingress=zwave-ingress
I don't know why Traefik couldn't find a service for the acme solver and the internet didn't offer much help either. I tried spinning up a super simple service to make sure it wasn't related to ZWavejs2mqtt and that didn't work either. So after a while I decided on a whim to try nginx for ingress instead of Traefik. That worked on the first try. So I'm not going to spend any more time on figuring out why Traefik decided to stop playing nice with cert-manager and am just going to move forward with nginx for now.
At least I'm still having fun.
This post has been brought to you by Trader Joe's Red Refresh herbal tea. I decided to branch out from my Chamomile evening tea and this one is pleasant. Chamomile is still my favorite caffeine-free tea, but this will be a nice alternative from time to time.